| Key Takeaways: • Surveys can be used to better understand your target audience and their needs. • Quizzes assess students’ knowledge and understanding of course material. • Students may need to complete assessments to progress in the course. • Assessments can be used to evaluate students’ skills and competence. • Kajabi offers various tools for creating and managing surveys, quizzes, and assessments. |
Surveys, quizzes, and assessments are important tools in any online course or membership site. They not only help engage students but also gather valuable information to improve your content and better serve your audience. In this article, we will explore how you can use surveys, quizzes, and assessments on the Kajabi to enhance your course and provide a better learning experience for your students.
What Is the Difference Between Kajabi Surveys, Kajabi Quizzes, and Kajabi Assessments?
Kajabi offers three distinct tools for creating and managing surveys, quizzes, and assessments. While they may have some similarities, each tool serves a different purpose and has its unique features. Let’s break it down:
Kajabi Surveys:
- Purpose: Designed to gather feedback and information from an audience.
- Format: Can include a variety of question types, including open-ended questions, multiple-choice, and rating scales.
- Location: Can be used on courses or on websites and landing pages.
Features:
- Provide valuable data for informing course content and marketing strategies
- Help understand target audience needs and interests
- Can be used to gather testimonials and reviews from customers
Kajabi Quizzes:
- Purpose: Primarily designed to test a student’s knowledge on specific topics within a course.
- Format: Often use multiple-choice questions, but can include other question types.
- Location: Embedded within a course or product.
Features:
- Allow file and photo uploads as part of answers
- Help identify areas where course content might need improvement
- Provide immediate feedback to students
Kajabi Assessments:
- Purpose: Can be used to test knowledge, but also to gather broader information about customers or potential clients.
- Format: May include a wider range of question types, including open-ended questions.
- Location: Can be used on courses or on websites and landing pages.
Features:
- Help understand customer needs and interests
- Can be used to tailor content and product offerings
- When used on landing pages, can prompt visitors to join email lists
All three tools can be useful in different aspects of your online business. It’s important to understand their distinct purposes and features to effectively utilize them in your course or membership site.
What Are the Benefits of Using Surveys, Assessments and Quizzes in Kajabi?
Using surveys, quizzes, and assessments in Kajabi offers many benefits for both instructors and students. Some of the key advantages include:
Personalize Offers
Surveys and assessments can provide valuable insights into your target audience. This information can be used to tailor your offerings, such as creating new products or tweaking existing ones to better meet their needs.
Improve Course Content
Quizzes and assessments can help identify areas where students may need more clarification or additional resources. This feedback can be used to improve the quality of your course content and ensure that students are getting the most out of their learning experience.
Boost Engagement
Interactive elements like quizzes and surveys can help keep students engaged throughout the course. They provide a break from traditional lecture-style lessons and allow students to actively participate in their learning.
Gain Valuable Data
Surveys, quizzes, and assessments all provide valuable data that can be used to improve your course and marketing strategies. The feedback gathered can give you a better understanding of your audience’s needs, interests, and pain points.
Save Time and Increase Efficiency
Creating surveys, quizzes, and assessments in Kajabi is quick and easy. You can save time by using templates or cloning previous ones for similar courses. Additionally, these tools can help automate the process of gathering feedback or testing knowledge, freeing up more time for instructors to focus on other aspects of their business.
What is an Assessment in Kajabi?
In Kajabi, assessments are helpful tools to check what students know and get feedback. When added to a course, they help track how well students understand the material and their progress. You can set up automatic grading, so students can see their scores and passing marks right after they submit their answers. This quick feedback helps both students and course creators understand how much has been learned.
Assessments are really helpful on websites or landing pages. They gather feedback from visitors by asking open-ended questions, which lets people share a variety of answers. This helps you get more detailed information from your audience.
Additionally, Kajabi boosts its features by encouraging visitors to join your email list after they finish an assessment on a landing page or website. This automatic signup helps you grow your email list and connect with potential customers better.
How to Create an Assessment in Kajabi
Creating an assessment in Kajabi is a straightforward process. Follow these steps to set up your own assessment:
Step 1: Make the Assessment
To make a new Assessment:
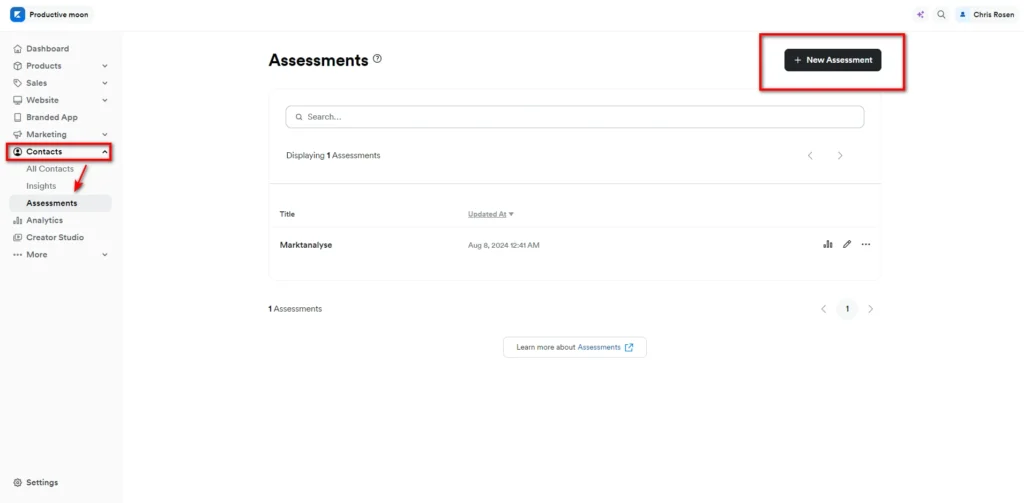
- Go to the Contacts tab on your Dashboard.
- Choose Assessments.
- Click on Get started if this is your very first Assessment. If you’ve done one before, click on + New Assessment.
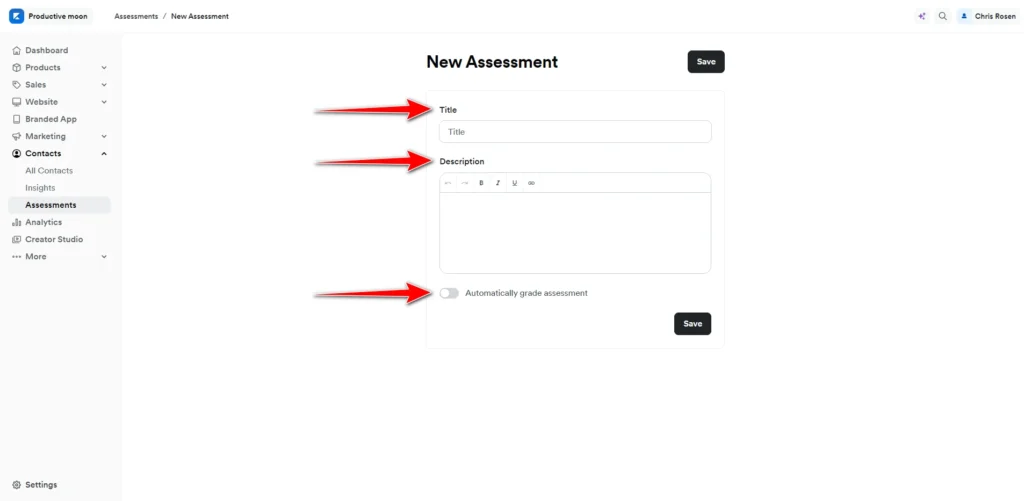
Fill in the details to start customizing your Assessment, including a Title, Description, and optional automatic grading.
Step 2: Personalize Your Assessment
In the Assessment Editor, you can make changes to your Assessment. This includes adjusting the details, choosing the preferred Language, adding Automations to streamline processes, and setting up your After Submission preferences. All of these steps are important for creating an Assessment that truly meets the needs of your business.
Details of Your Assessment
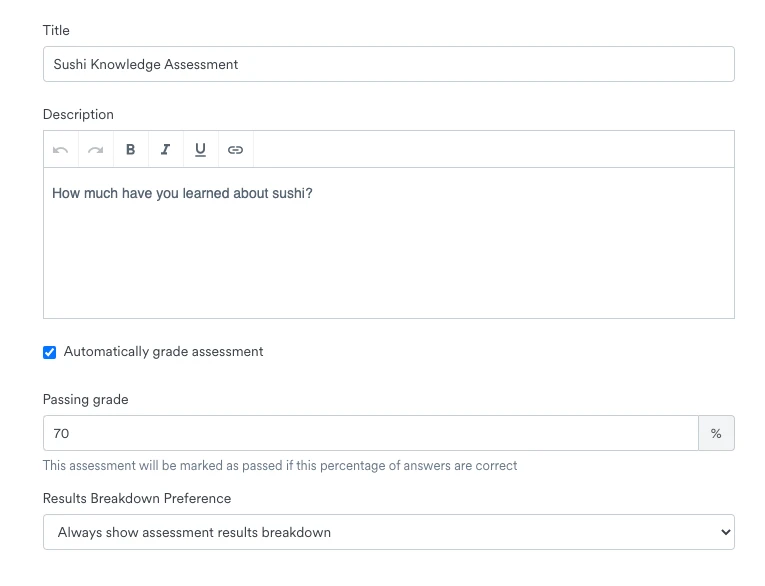
When it comes to the details of your Assessment, you can do several things to make it unique:
- You can change the Title of your Assessment to something that reflects its purpose.
- You can also add a Description to explain what the Assessment is about and what participants can expect.
- There’s an option to Automatically grade the assessment—you can choose to turn this feature on or off based on your preferences.
- Additionally, you can set up your Results Breakdown Preference. This lets you decide whether to show or hide the results to those who take the Assessment once they finish.
Language
You can change the messages that your users see when they take the Assessment. Here are the parts you can customize:
- Start text: This is the message that appears when users begin the Assessment.
- Passed text: This is what users will see if they successfully pass the Assessment.
- Failed text: This is the message that will be shown if users do not pass the Assessment.
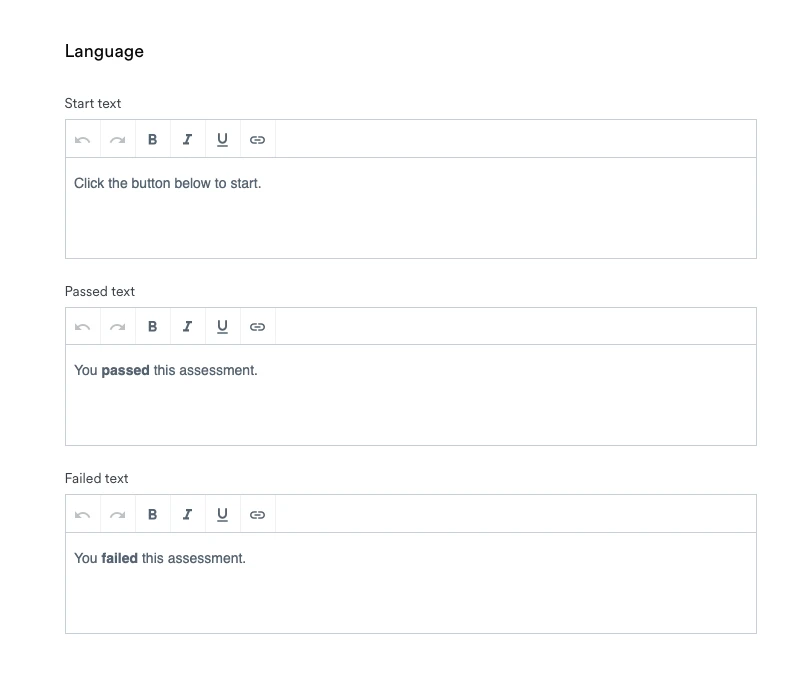
Feel free to make your text more engaging by using bold, italics, underlining, or even adding hyperlinks to give users more information or direct them to other resources.
You Might Also Like:
Automations
At the bottom of the Assessment Editor, you’ll find a section where you can add Automations. These Automations are helpful actions that can happen automatically after someone completes the Assessment. You can set these actions to trigger under certain conditions, specifically when the Assessment is finished. Here are some of the actions you can choose from:
- Grant an offer: Give the user a special offer.
- Revoke an offer: Take back an offer that was previously given.
- Subscribe to an email sequence: Sign the user up for a series of emails.
- Unsubscribe from an email sequence: Remove the user from an email list.
- Register for an event: Sign the user up to attend an event.
- Deregister from an event: Cancel the user’s registration for an event.
- Add a tag: Label the user with a specific tag for better organization.
- Remove a tag: Take away a tag from the user’s profile.
- Send an email: Deliver a message directly to the user.
- Send a single-use coupon: Provide a one-time discount code for the user.
To learn more about how Automations work in Kajabi, make sure to read the complete guide titled Automations Overview. It will give you a better understanding of how to utilize these features effectively!
After Submission Settings
Once someone completes the Assessment, you can set up notifications so that everyone stays informed. Here’s what you can do:
- You can choose to send an email to the person who completed the Assessment, including a link to their results.
- Additionally, you can set it up so that your team receives an email with a link to the results every time someone finishes the Assessment.
How to Set Up After Submission Settings:
To get started with these settings, follow these simple steps:
- Go to your Dashboard and click on the Contacts tab.
- Next, select the Assessments option from the menu.
- Find the title of the Assessment that you want to modify and click on it to open the details.
- Look for the After Submission card located on the right side of the page.
- You will see a list of notification settings. Simply check the box(es) next to the options you want to enable.
How to Share an Assessment
If you want to share your Assessments and gather feedback through quizzes or surveys, you can easily add them to different areas, such as:
- Your website pages
- Specific products you offer
By sharing your Assessments in these places, you can engage your contacts and gather valuable information from them.
How to View Assessment Responses
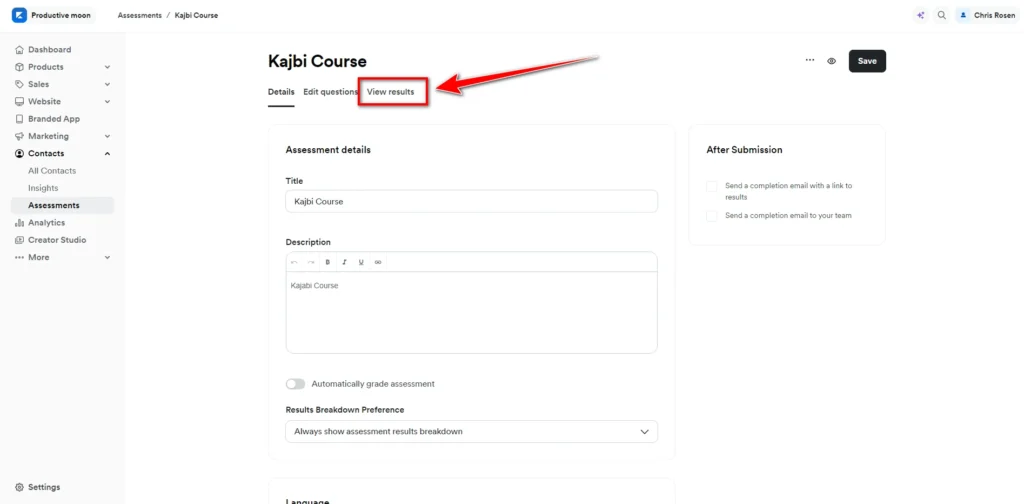
If you want to see the results of your Assessment, follow these simple steps:
- First, go to the Contacts tab located on your Dashboard. This is where you can manage all your contacts and assessments.
- Next, find and select the Assessments option. This will take you to the section where all your assessments are listed.
- Look for the title of the Assessment that you want to check out and click on it. This action will open up that specific Assessment for you.
- Now, look for the View Results tab and select it. This is where you can find all the responses from the participants.
- You can see the answers from each contact by either clicking on their email address or by exporting the Assessment Results for a more detailed review.
And that’s how you can create and customize Assessments!
What is a Quiz in Kajabi?
A quiz in Kajabi is a collection of questions presented to students within a product or course. These quizzes are designed for existing customers who have purchased the course, allowing you to assess their understanding and retention of the material.
After a student completes the quiz, you have the option to choose whether it will be automatically graded by Kajabi or if you prefer to manually grade it yourself. This flexibility helps you manage the assessment process according to your preferences and needs.
Key Features:
- Integration: Quizzes are embedded directly within Kajabi courses or products.
- Question Types: Multiple Choice, Checkboxes (multiple correct answers), Short Answer, File Upload
- Customization: Set passing grades, Choose whether to automatically publish results, Customize feedback for correct and incorrect answers
- Grading Options: Automatic grading for multiple-choice and checkbox questions, Manual grading for short answer and file upload questions
- Result Reporting: View individual and overall quiz results, Export results for further analysis
Benefits of Using Quizzes:
- Assess Learning: Gauge how well students are grasping the course material.
- Engage Students: Interactive quizzes keep learners actively involved in the course.
- Provide Feedback: Instant results help students understand their progress.
- Improve Course Content: Identify areas where students struggle and refine your content accordingly.
- Motivate Learners: Quizzes can create a sense of accomplishment and encourage progress.
- Reinforce Key Concepts: Regular quizzing helps cement important information in students’ minds.
Using quizzes in your Kajabi courses can make learning more fun and effective for your students. It also helps you see how they are doing and what they understand.
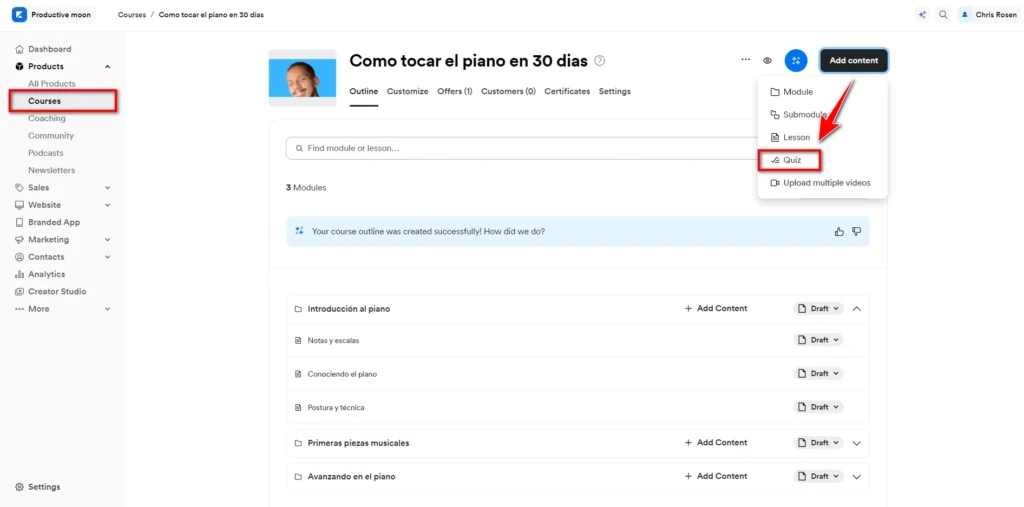
1. How to Create a Quiz in Kajabi
You can add quizzes to your Course at any time to check how well your customers understand the material.
To create a Quiz:
- Go to the Products tab on your Dashboard.
- Choose the Course Product where you want to add the Quiz or make a new Course.
- Click + Add Content on the Module where you’d like to add the Quiz (or click the Add content button at the top right of the Course Outline).
- Choose Quiz to open the Quiz Builder and start making your Quiz.
Quiz Questions
Make different types of questions using four options:
- Multiple choice – choose one correct answer from several options.
- Checkboxes – choose one or more correct answers from several options.
- Short answer – write a response in a text box.
- File upload – upload a file as your answer to a question.
To add a Multiple choice or Checkboxes question to your Quiz:
- Enter your question in the Question box.
- Pick Multiple choice or Checkboxes from the drop-down menu.
- Use the Graded question toggle to decide if the question should be graded. If it’s on, the question will be graded automatically.
- (Optional) Click Attach image if you want to add an image to your question.
- Type your first answer option in the Option 1 box. (Optional) Click the image icon to add an image to your answer. (Optional) Click Add explanation to explain the answer. This explanation will show up with the quiz results after grading.
- Click Add option to add more answer options and repeat until you’ve added all.
- For a graded question: Click the radio button next to the right answer for a Multiple choice question. Click the checkboxes next to the right answers for a Checkboxes question.
- Click Save to keep your changes.
To add a Short answer or File upload question to your Quiz:
- Type your question in the Question text box.
- Choose either Short answer or File upload from the drop-down menu.
- Use the Graded question switch to decide if it will be graded or not. If it’s on, you’ll need to grade Short answer and File upload questions yourself.
- (Optional) You can add an image to your question if you want.
- Click Save to keep your changes.
- To add another question, click + Add question and repeat these steps until you’ve added all your Quiz questions.
Non-Graded Quizzes
If you want to make a Quiz that isn’t graded at all, make sure the Graded question switch is off, and you should see the Non-graded label on all your Quiz questions.
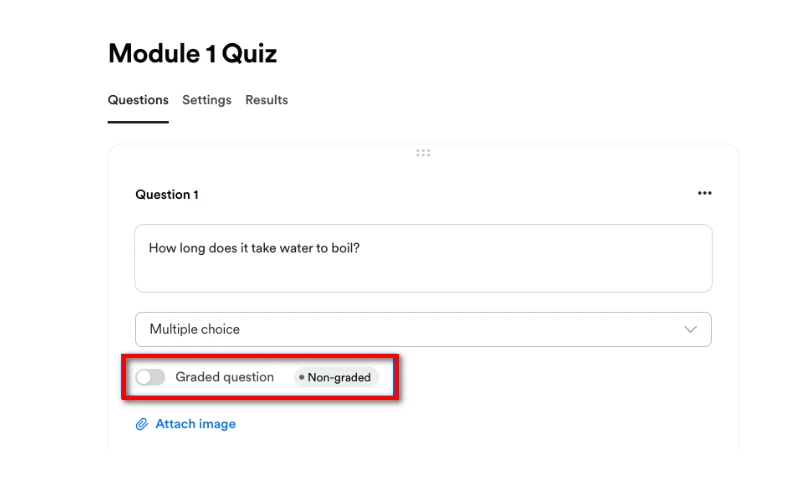
Make sure to turn off the Set a passing grade option in your Quiz Settings:
2. Edit Your Quiz
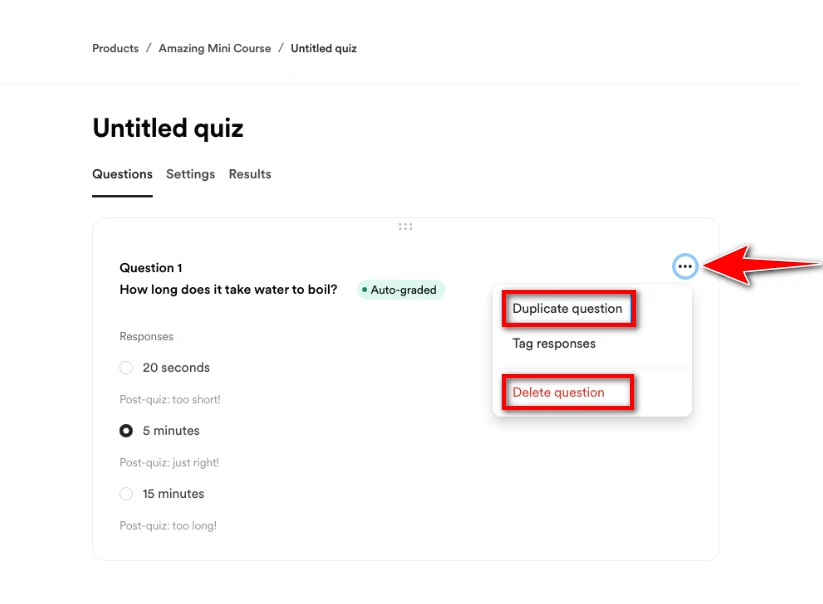
After you create a quiz, you can make changes by copying a question, deleting one, or rearranging your questions. You can also set up an automation to tag quiz-takers based on their answers to multiple choice or checkbox questions.
To copy or delete a question:
- Click the … menu in the top right corner of the question.
- Choose Duplicate question to copy it or Delete question to remove it.
- Click Save to keep your changes.
To rearrange your questions:
- Find the dotted icon at the top center of the question block you want to move.
- Click the icon and drag it to your desired spot in the quiz.
- Click Save to apply your changes.
To reorder answer options within a question, drag and drop using the dotted icon on the left of each option.
To tag a quiz-taker based on their answers:
- Click the … menu in the top right corner of the question.
- Select Tag responses.
- Use the dropdown menu next to each answer option to choose or create a tag you want to add to the quiz-taker’s profile when they select that answer.
- Click Done once you finish setting up your tagging.
- Click Save to apply your changes.
If you want to remove tags, just select Tag responses again and click the X next to each tag you want to delete.
3. Customize Your Quiz Settings
Use the Settings tab in the Quiz Builder to change your Quiz title and description, set a passing score, adjust how Quiz takers get their results, set up notifications, or add automated actions.
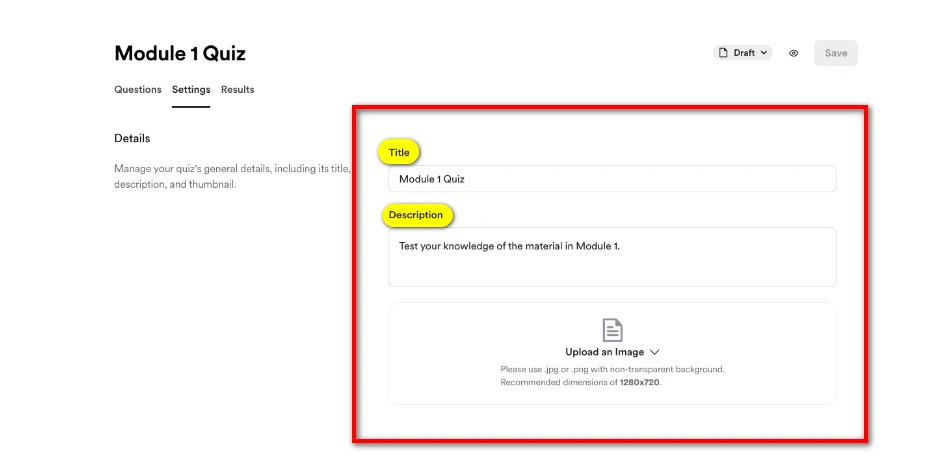
Details
Add a Title, Description, and Image for your Quiz:
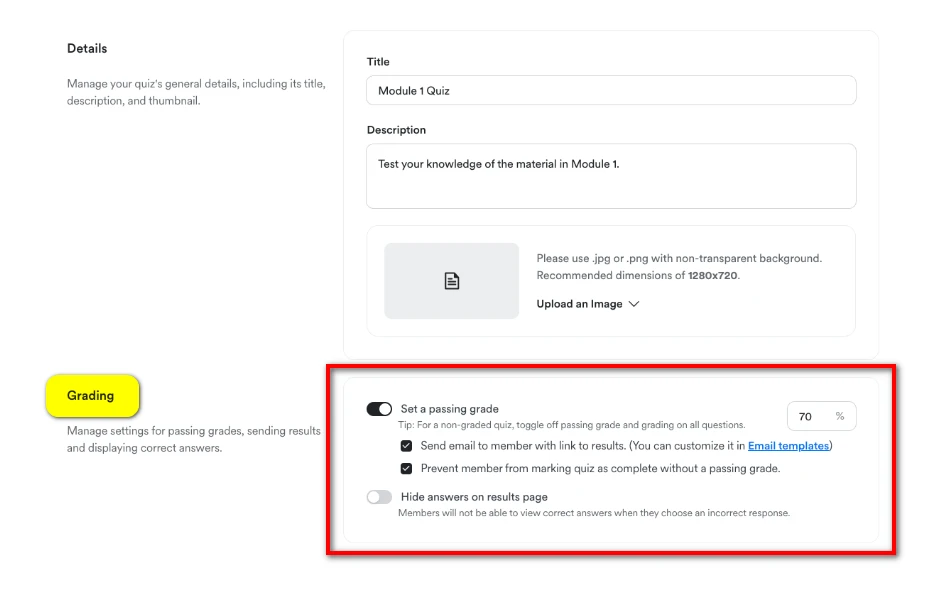
Grading
Turn on the Set a passing grade option to decide if auto-graded or manually graded Quizzes are passed or failed. When you enable this, you can choose a passing percentage. You can also:
- Send an email to the Quiz taker with a link to their results. You can change the email content in Settings > Email Templates > Quiz Grade Published.
- Stop the Quiz taker from marking the quiz as complete if they haven’t passed. Important Note: If you choose this, the “Mark as complete” button will be disabled until they pass the Quiz, preventing them from moving on. To ensure they can’t access other content until they pass, you need to lock the Module(s) or Submodule(s) until they finish the Quiz.
Turn on the Hide answers on results page option to stop Quiz takers from seeing the correct answers to the questions they got wrong after submitting the Quiz.
Notifications
You can also decide who gets notified when a Quiz is completed:
- Send the Quiz taker a confirmation email with a link to their results. You can edit this email content in Settings > Email Templates > Quiz Completion.
- Notify yourself or your team with an email about the Quiz completion.
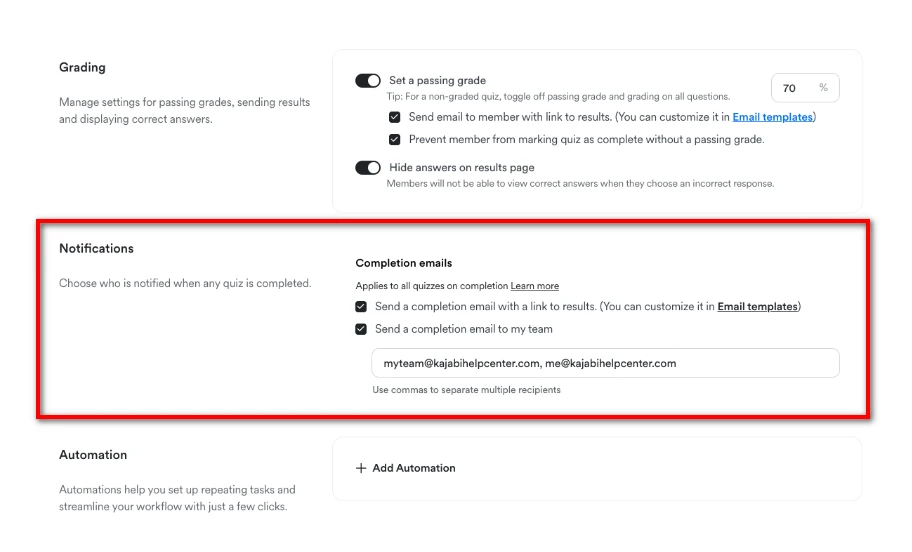
Automation
Click + Add Automation to set up an automated action for any of these events:
- Quiz is completed
- Quiz is failed
- Quiz is passed
4. Preview and Publish Your Quiz
Once you’ve finished making your Quiz, check how it looks for the quiz takers and then publish it to your Course.
To preview your Quiz:
- Click the Preview icon at the top right corner of the Quiz Builder (next to the Save button).
- Answer the Quiz questions as if you were taking it.
- Click Submit to send your answers.
- When the pop-up appears, click Yes, submit to confirm:
- If all your Quiz questions are auto-graded (or a mix of auto-graded and non-graded) and you’ve enabled the Set passing grade option, you’ll see your score and know if you passed or failed.
- If all your Quiz questions are auto-graded (or a mix) but you’ve turned off Set passing grade, you’ll just see your score.
- If any questions are manually graded, you’ll see a message saying your grade will be available after review. If all questions are non-graded, you’ll get a notification that your answers have been saved.
To publish your Quiz:
- Click the status dropdown at the top right of the Quiz Builder (next to the Preview icon). It will say “Draft” by default.
- Choose Publish to make your Quiz live. (Note: If you want to change it back to Draft status, click the dropdown and select Draft).
5. How to Check Results and Grade Your Quiz
You can see the results of your Quiz takers on the Results tab in the Quiz Builder. Here, you can also grade Short answer and File upload questions manually. Make sure to grade each completed Quiz and leave comments for your Quiz takers.
To grade a Quiz:
- Go to the Products tab from your Dashboard.
- Choose the Course Product where you want to grade the Quiz.
- Click on the title of your Quiz or the Edit quiz icon to open the Quiz Builder.
- Click the Results tab below the Quiz title.
- Find the results for each Quiz taker.
- Click Grade Quiz:
Mark each answer as correct or incorrect
- To mark an answer as correct, click the checkmark icon.
- To mark an answer as incorrect, click the X icon.
You won’t be able to grade non-graded or auto-graded questions, but you can still leave feedback on them.
Leave your feedback
Click Leave feedback below a question to give your Quiz Taker some thoughts on that question. You can help them fix their mistakes or just give them a nice note. Click Submit to save your feedback.
Add more comments
You can also write extra comments on the Quiz results to help your Quiz taker or share some encouraging words.
When you finish grading a Quiz, click Publish grade at the top right to share the results with your Quiz Taker.
Viewing Quiz Results
When you publish a graded Quiz, Quiz Takers can see their results in the Course. If you turned on the Send email to member with link to results option, they will also get an email with a link to their results. They can retake the Quiz anytime by clicking the “Retake quiz” button.
6. How to Delete a Quiz
You can remove a Quiz from your Course by deleting it in the Quiz Settings or Course Outline.
To delete a Quiz from Quiz Settings:
- Go to the Products tab.
- Choose the Course Product that has the Quiz you want to delete.
- Click on the title of the Quiz to open it.
- Go to the Settings tab below the Quiz title.
- Scroll to the bottom of the page.
- Click Delete Quiz.
- Confirm by clicking Delete in the prompt.
To delete a Quiz from the Course Outline:
- Go to the Products tab.
- Select the Course Product that has the Quiz you want to delete.
- Find your Quiz in the Course Outline.
- Click the status (like Published or Draft) next to the Quiz title.
- Select Delete Quiz.
- Confirm by clicking Delete Quiz again in the prompt.
That’s it! Now you know how to create and customize Quizzes!
Conclusion
Using surveys, quizzes, and assessments in Kajabi can really boost the quality of online courses and membership sites. These tools help engage students by offering fun and interactive learning experiences that go beyond regular teaching. By gathering feedback through surveys and assessments, course creators can understand what students need and want, allowing them to improve their content. Kajabi makes it easy to set up and manage these tools, helping instructors create personalized learning experiences. Adding these features to your Kajabi platform not only increases student engagement but also creates a more exciting and effective learning environment.
If you want to get started with Kajabi, sign up for Kajabi 30-Day Free Trial today! ! You’ll have access to all the features mentioned in this guide and more. Take your online course or membership site to the next level with Kajabi’s powerful tools.