| Key Notes: • Kajabi gives you a free “.mykajabi.com” web address when you start • You can change this to your own address if you want – it’s up to you • You’ll need your own domain name to do this (like mywebsite.com) • No domain? No problem! You can get one from Namecheap or GoDaddy • We’ve got easy-to-follow steps to help you connect your new address to your Kajabi site |
Have you ever looked at your Kajabi website address and wondered why it ends with “mykajabi.com”? Don’t worry, you’re not alone! Many Kajabi users ask this question when they start out.
In this blog guide, we’ll explain why your website has that ending and how you can change it to something more personal. We’ll take you step-by-step through the procedure in easily understood.
What Is “My Kajabi”?
When you sign up for Kajabi to create and sell your online courses or digital products, you get a free web address right away. This address always ends with “.mykajabi.com”. It’s Kajabi’s way of giving you a quick start in the online world.
Think of it like this: Kajabi is giving you a temporary home for your business. It’s like moving into a furnished apartment where everything is ready for you. You don’t have to worry about setting up the basics – Kajabi has done that for you with the free subdomain “.mykajabi.com” that they offer for your Kajabi website.
This free address has some good points:
- It’s completely free – no extra costs
- It works instantly – no waiting time
- It’s easy – no tech skills needed
But it also has some drawbacks:
- It might not look very professional
- Customers may find it difficult to remember
- It doesn’t help much with search engine rankings
Many Kajabi users start with this free address or subdomain. It’s a great way to see how everything works and get familiar with the platform without spending any extra money. But once you’re ready to take your business to the next level, it’s time to consider switching to a custom domain.
What Is A Custom Domain?
A custom domain is a unique web address that you choose for your website. It can be anything you want, as long as it’s available and not already in use by someone else. For example, instead of your website being “mywebsite.mykajabi.com”, you could have “mywebsite.com”. This gives your business a more professional and personalized look.
Why Should You Consider A Custom Domain?
There are several reasons why having a custom domain for your Kajabi website can benefit your business:
- Branding: A unique website address that matches your company name helps customers remember and find you online easily.
- Professionalism: Having your own domain enhances professionalism and trustworthiness. This can make your business more appealing to potential customers compared to using a subdomain.
- Visibility: Using your own domain can enhance your website’s ranking on search engines. This makes it easier for potential customers to find you.
- Flexibility: A custom domain allows you to create various subdomains or direct them to different pages on your Kajabi site. This feature is ideal for managing separate landing pages or sales funnels.
- Control: Owning your domain provides greater control over your online presence. It enables you to manage your brand identity without any limitations.
My Kajabi Domain: How To Customize
If you’ve looked into changing your “mykajabi.com” domain, you might have found the process to be a bit overwhelming. It can feel long and complicated, but don’t worry; it’s easier than it seems! Many people have gone through this before, and with some guidance, you can too. We are here to help you every step of the way, making sure that you understand everything involved.
To make things simpler, we’ve created a six-step guide that will help you customize the domain link for your Kajabi website. You’ll be able to complete this task in under 30 minutes, allowing you to enhance your online presence without much hassle. Let’s get started and make your website uniquely yours!
Step 1: Set Up Cloudflare for Your Domain
To get started, you’ll need to link your domain to Kajabi using Cloudflare. Cloudflare is great for security and helps your site run faster. Plus, it’s free! But first, make sure you have a registered domain. If you don’t have one yet, you can register it through services like GoDaddy or NameCheap.
Here’s how to add your domain to Cloudflare:
- Go to the “Settings” section and select “Custom Domains.”
- Input the domain you want to switch from “mykajabi.com” and hit “Begin Set-up.”
- You’ll be taken to a page where you can create a free Cloudflare account.
- After signing in, you can add your domain to Cloudflare.
Step 2: Setting Up DNS and CNAME
Next, you’ll need to check your DNS records and confirm your domain details. You’ll also choose a plan (the free one).
- After adding your domain to Cloudflare, click “Scan DNS Records.” Once the scan is done, hit “Continue Setup.”
- Check that all your records are correct. If you’ve added a domain you already own, make sure all the information is accurate. When you’re done checking, click “Continue” at the bottom.
- Now, pick a plan. To set up your custom domain with Kajabi, choose “Free Plan” followed by “Free Website.” Then click “Continue” at the bottom.
Setting Up Your Domain with Cloudflare
- Click on the “DNS” tab at the top of the page.
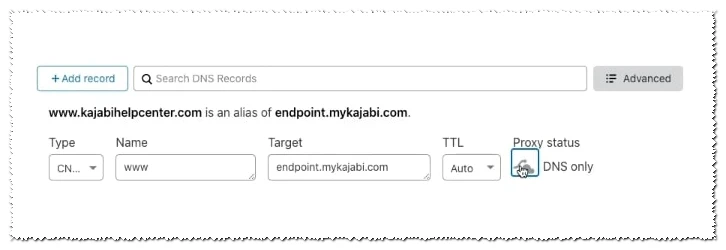
- You’ll see a prompt to add a CNAME record. Here, enter a hostname (like “www” or another subdomain) and the Target. Choose “www” or another name that fits your needs.
- If you see a record for “www,” find it, delete the “X” at the end, and click “Save” again. You can also use a different subdomain like “courses” or “members” if you prefer.
- Kajabi provides the text for the “Target” box. Copy the text exactly as it appears (look for “endpoint.mykajabi.com” in the example below) and paste it into the box.
- From the drop-down menu, select “2-minute” for TTL and “DNS only” for Proxy status.
- Finally, click “Save” at the bottom of the page.
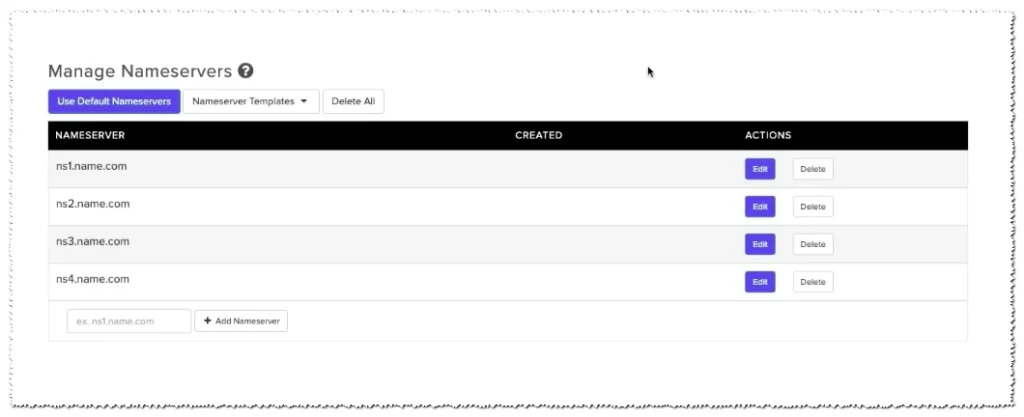
Step #3 Change Your Name Servers at Your Domain Registrar
To switch your name servers to Cloudflare’s, follow these steps:
- Once your CNAME setup is done, you’ll go to the “Manage Name Servers” screen.
- Click “Edit” in the actions menu.
- Replace all the names with those given by Cloudflare.
- Double-check everything, then click “Save Changes.”
Remember, don’t skip this step when setting up your domain.
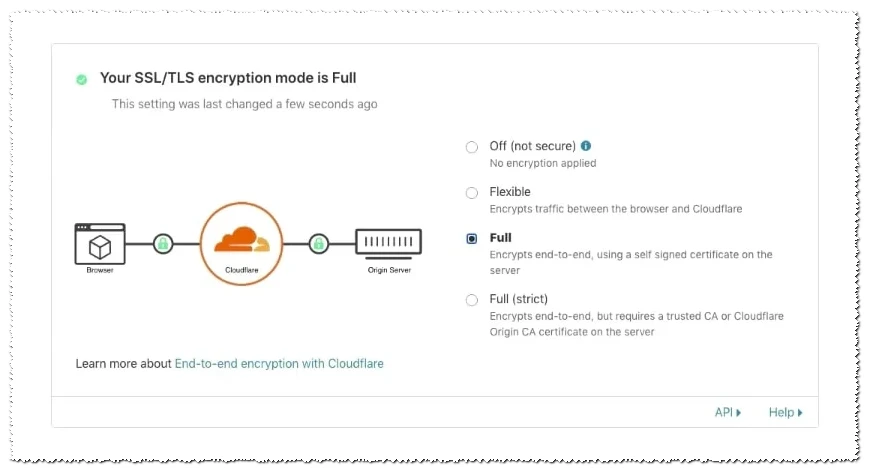
Step #4 Set Up Security and Speed
Now that your record setup is finished, it’s time to enable Full SSL.
- In the SSL/TTL Menu, change the SSL/TTL mode to “Full” on the right side of the screen.
- This may take up to 24 hours to activate, but often it happens within 15-30 minutes.
- You can check if your certificate is active in the “Edge Certificates” menu.
- While you’re there, turn on “Always Use HTTPS.” This will redirect users who enter “HTTP” to “HTTPS.”
Step #5: Set Up 301 Redirect
If your website doesn’t use “www” or if users forget to type it, you need to create a 301 redirect for your domain. This makes sure your website address is always easy to reach.
- Log in to your Cloudflare dashboard and go to “Page Rules.”
- Click on “Create page rule.”
- In the first field, type: mynewkajabidomain.com/*
- Under “Add a Setting,” choose “Forwarding URL.”
- For “Select Status Code,” pick: 301 – Permanent Redirect.
- For the destination URL, enter: https://www.mynewkajabidomain.com/$1.
- Click “Save and Deploy.”
You can see an example of this process in the image below.

Step #6: Save Your Custom Kajabi Domain
Once you’ve done all the previous steps, you can save your new custom Kajabi domain.
- Go to “Domain Settings” on your site.
- In your Kajabi Admin Dashboard, click on “Settings.”
- Go to “Domain” and then “Step 4.”
- Add your custom domain.
- Don’t forget to click “Confirm.”
Congratulations! You’ve successfully added your custom domain!
Conclusion
Changing your “mykajabi.com” domain to a custom one is super easy if you follow our six-step guide carefully. Cloudflare makes personalizing your domain straightforward, which is why Kajabi relies on it for the Kajabi Heroes program, just like you can! Using Cloudflare also ensures your users will have a great online experience when signing up for your courses. Our team of experts has crafted this detailed step-by-step guide based on our experiences with both Kajabi and Cloudflare.
Whether you want to register a new domain or use one you already own, linking your custom domain to Kajabi is a breeze! With a little help, you can make your website uniquely yours.
Ready to get started? Click for your 30-day free trial and take your website to the next level!